Smoked Curry Sweet Potato Patties

Smoked Curry Sweet Potato Patties

Last week was spring break, so I didn’t get a chance to cook that much :/ However, I came back refreshed and ready to cook! Apparently there was a lot brewing in my brain because what occurred when I made these patties….Who knows where it came from. They taste fabulous, are packed with nutrition, and really simple!
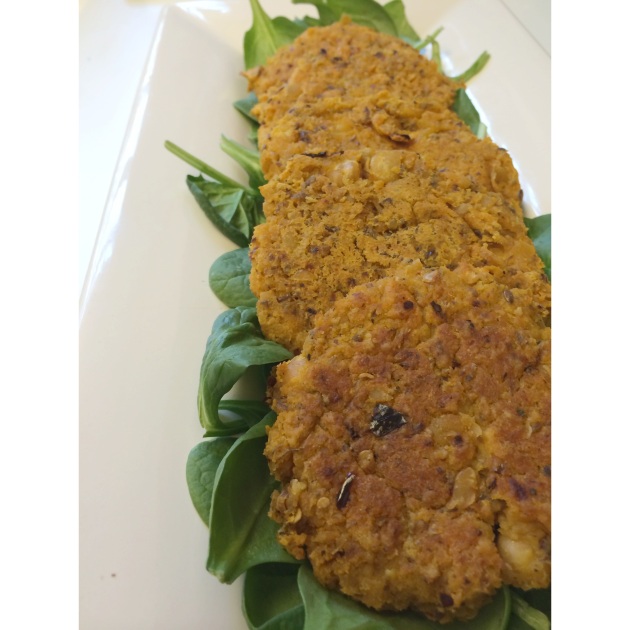
Sweet Potato Patty
1 cooked XLarge Sweet Potato (or two small/medium)
1 13oz can Chickpeas
2 TBSP coconut oil
1 TBSP Trader Joe’s South African Smoke Blend
1 tsp nutritional yeast
1/2 tsp curry powder
1 TBSP ground flaxseed

Cook your sweet potato any way you like to get it soft and mashable on the inside. You just need it so that you are able to scoop out the orange “meat” for the patty. Here’s how I cook mine!

Wash your extra large sweet potato off with a paper towel(Just to remove the dirt) Then stab it multiple times with a sharp knife to make steam slits. Wrap it in a dampened paper towel and place it in the microwave for about 7-9 minutes (depending on the size) After it is cooked through and soft, slice the potato in half and let it cool off.

Preheat oven to 350*

Take out your can of chickpeas, drain and wash them. Scoop out the orange “meat” of your sweet potato into a food processor and pour in your chickpeas as well. Add in your two TBSP of coconut oil, and pulse until it is mostly mixed except for a few whole chickpeas.

Scoop out the mash from your food processor into a medium sized bowl. At this point you can add in the rest of your spices and mix until well combined.

Spread out foil on a cookie sheet and spray with cooking spray. (Make sure your hands are washed at this point) Grab handfuls of your chickpea/sweet potato mash, and form into patties. You should end up with about 6 medium sized servings. Place them on the cookie sheet and into the oven for 15 minutes.

After the first 15 minutes, take out the patties and flip them. Place them back in the oven for another 15 minutes.

At this point, take them out of the oven and let them cool for a minute or two before eating.

Dijon Hummus
1 TBSP garlic hummus
1/2 tsp Dijon Mustard

Mix. Spread on patty. Enjoy a slight piece of heaven.
These are absolutely wonderful, and I really hope you make them!!!

Please leave me comments on how yours turned out:)

thissimplevegan xoxo

But what do vegans eat for breakfast? (and where does your protein come from?)

But what do vegans eat for breakfast? (and where does your protein come from?)

If you have been a vegan for any amount of time, than you know the ultimate question. “Where do you get your protein?” I get it, I really do…but I’d like to put this idea that vegans cannot get enough protein to rest.

Protein is essential in the body for many reasons, one of them being the rebuilding of muscle tears and exhaustion. It helps extract nutrients ingested, and uses them to create antibodies that fight off illness(the common cold).

Most often the Standard American Diet uses meat as the ‘protein’ in a meal. This makes sense, because there are 30g of protein in a single chicken breast. However, with that chicken breast you are also ingesting the antibiotics pumped into the chicken while it was alive, as well as the ‘chicken soup’ (blood, feces, and other nasty excrements from the genetically modified creature) it sat in before being cleaned with bleach and then packaged for your consumption.

Instead, as a vegan, you chose to get your protein from clean, cruelty-free sources. One example is tempeh. Tempeh provides at least 15grams of protein for only half a cup. Say you ate 1cup? 30gram right there! Take that you chicken breast!!!!

HOWEVER, my first meal to tackle for all of you is breakfast. I often times stick to oatmeal in the mornings. I mix it up with toppings, but my favorites are usually blueberries(antioxidants), banana(fiber), and strawberries(has both of the previous awesomeness in it).

Basic Morning Oatmeal
1/2c quick cooking rolled oats
2Tbsp ground flaxseed
1/2c strawberries
1/4c blueberries
1 sliced banana
1/4c crushed walnuts
2Tbsp organic peanut butter
Enough coconut milk to cook the oatmeal and flaxseed

Super quick and easy, but also delicious. Below is the approximate nutritional facts of this meal. As you can see it provides 28g of protein, which means by lunchtime you are almost halfway to the necessary amount of protein needed in a day. (Which for an average american woman is about 60g)

IMG_5205


Voila!

I think it’s really important that as vegans we explain that our choice isn’t only for ethical reasons, but also makes nutritional sense.

For more info, check out

http://www.thechinastudy.com

Unknown


another resource I’ve found helpful is

Vegan For Life

51LnVNCqltL._SY344_PJlook-inside-v2,TopRight,1,0_SH20_BO1,204,203,200_


http://books.google.com/books?id=1f_RoDUKydgC&printsec=frontcover&dq=vegan+for+life&hl=en&sa=X&ei=1nEXU7-tGqHy0gHawIC4Bw&ved=0CCkQ6AEwAA#v=onepage&q=vegan%20for%20life&f=false


I hope you enjoy your morning protein as well! Leave me comments!


xoxoxo thissimplevegan

Vegan Quinoa Chili

Vegan Quinoa Chili

It is so cold right now. The ice and snow had finally begun to melt, we felt the bitter cold and chill begin to thaw, and then……BOOM. Even colder. During this week I also started rehearsal, so my schedule was going to get a little busier. I needed something that was easy to make a larger batch of so it could last me for awhile. I felt the need for something heartier than soup. Then I remembered what always felt good in my belly…CHILI. Yes, a big pot of warm, thick, sweet and spicy chili. I couldn’t wait to get started.

One reason I truly love making chili is because it is so easy. So so easy. You chop it all up, throw it in a pot, let it sit on a hot stove for an hour, and then AWESOMENESS.

Something to note is that I did make the quinoa beforehand so that it was ready when the chili was done cooking. However, you could easily cook your quinoa after your chili is on the stove simmering away.

Vegan Quinoa Chili
1c of rainbow quinoa(uncooked)
2c water to cook quinoa

28oz can crushed tomatoes
1c vegetable broth
2TBSP olive oil
3 cloves chopped garlic
1/2 sweet onion, chopped
1 sweet bell pepper, chopped
1 zucchini, chopped
3 carrot stalks, peeled and sliced into 1/2inch cuts
1 sweet potato, peeled and cubed
3 celery stalks, sliced into 1/2inch cuts
1/2tsp chili powder
1/4tsp salt
1/2tsp pepper
Dash of paprika
14oz can black beans

First, prepare quinoa as the package instructs and set aside.

Start by heating olive oil in the bottom of a large pot. Once heated, toss in your chopped garlic and onions. Cook them until the onions are beginning to turn translucent, and pour in your tomatoes and broth. Mix up the onions, garlic, and sauce. Now comes the best part,just add the rest of the ingredients in except for the black beans. Using a wooden spoon stir everything up and then cover with a slight opening to allow some steam to get out. Simmer this for at LEAST 45 minutes. Make sure during this time you drain and wash your beans. Once you’re a few minutes away (about 10) from being done cooking your chili, add in the beans. Mix everything together.

To finish off the chili, spoon quinoa into the bottom of the bowls you are going to serve your chili in. Pour chili on top of the quinoa, and make it a heaping portion. Trust me on this one. I like to mix everything together and really make it a chili quinoa mush. I am also a fan of spicy, so I topped it with some hot sauce as well.

This turned out much better than expected, and I HIGHLY recommend it. It should make about 3-4 servings depending on the size of bowl you make yourself.

I really enjoyed this, and I hope you do too! Leave me comments on how yours turns out!

xoxo thissimplevegan

Triple Berry Pie

Triple Berry Pie

For the first time in way too many weeks, I had a weekend off. A weekend to lie around and do absolutely nothing….ya know, except for bake and cook non stop. My boyfriend was coming into town, and I hadn’t seen him for a month. It was time to make a special something! Now, if you have ever asked for an opinion from a man EVER than you know the answer is pretty consistent. “Whatever you make, I’ll eat it.” *Le sigh* So I narrowed it down to make it reeeaaallll easy. What’s your favorite fruit? “Strawberry.” OH MY GOODNESS HE ANSWERED.

I went from there, strawberry alone? eh. Strawberry cheesecake? eh. Strawberry rhubarb? YUM. To bad no store in town had rhubarb. Womp womp.

So Triple Berry Pie it is!

I haven’t had pie in so long because everytime I’m in a vegan bakery I always get distracted by the pretty cupcakes!!!! But I was determined. Now I cannot tell a lie, I wasn’t ready to try and make a crust on my own so I grabbed the basic recipe from ‘Chloe’s Vegan Desserts’, and then made the filling on my lonesome. Even though I was disappointed by the no rhubarb thing, the triple berry pie ended up being the MOST wonderful decadence to have around on a weekend off. It might have even been lunch one day! So here’s my filling that I also suggest making into an ice cream topping, a fruit crumble, or as always…straight with a spoon.

Triple Berry Pie Filling
1 1/2 cup quartered strawberries
1 3/4 cups raspberries
1 1/4 cups blueberries
1/2 cup cane sugar
2 TBSP lemon juice
2 TBSP corn starch
1 TBSP chia seeds

Start by preheating the oven to 400*

Make the crust you have chosen, and get it almost completely prepared before you make the filling. In a large bowl, mix together all the berries. Mix one ingredient at a time, until all is thoroughly tossed in a bowl. Cover the bowl with plastic wrap and place in your refrigerator for about 10 mins. This allows the flavors to get wonderfully meshed as well as letting some of the moisture seep out.

While this is chilling, put your bottom crust into a 9inch pie dish and prep it for the filling. After you pull your fruit from the fridge, using a slotted spoon, spoon the fruit into the pie crust letting the extra moisture fall back into the bowl. The strawberries are going to release enough water when they cook that any extra water is just going to make the crust soggy. YERKY!

Lay your top crust on, either lattice or full top, and pinch the sides together. (For an extra sweetness kick, sprinkle some cane sugar on top) If you are doing the full crust, make sure to poke holes in the top to allow steam to release from the inside. And why not make a pretty design while you’re at it?! Place your pie into the oven for 15 minutes at 400*. After 15 mins, reduce the temperature 350* and cook for another 20-25 minutes.

After your pie is done baking, let it cool. Now comes the best part, eating a very, VERY large slice…to make sure it tastes juuuusssttt right;)

IMG_6039

I hope you enjoy! Leave me comments on how yours turns out!

xoxo thissimplevegan

Eggplant Risotto with a Basic Red Sauce

Eggplant Risotto with a Basic Red Sauce

Let me explain, I’ve been up since 5 a.m. and I’m so tired I can barely type this post. HOWEVER, this risotto is amazing, and the world needs to know about it. So no frills going on here, just the recipes that make your tastebuds happy!

Basic Red Sauce
1/2 medium onion chopped
2 cloves garlic minced
2 Tbsp olive oil to cook onion
28oz can tomato sauce
14.5oz can petite diced tomatoes
1 1/2 tsp brown sugar
1Tbsp basil
1 tsp oregano
salt and pepper to taste

Heat olive oil in a large pot. Throw in your onions and garlic and cook until onions start to become translucent. Pour your 28oz can of smooth tomato sauce and diced tomatoes into the pot and give everything a quick stir. After you’ve mixed it, add in the sugar and the rest of the spices. Let the sauce simmer on low, covered with a small opening for at least 20 minutes. The longer you let it sit, the more the flavors will combine and become super awesome. Remember, this is a simple basic red sauce so you can add or subtract any of the ingredients. Personally I think this is more than yummy enough so I would say follow the recipe exactly for the first try! But of course you can personalize it more if you’d like.

Eggplant Risotto
Half of a medium eggplant, peeled and sliced into 1/2 inch slices
2 Tbsp olive oil
1 1/2c veggie broth
1c red sauce (either the the basic red sauce above, or a yummy jar sauce)
3/4c arborio rice
Extras: Sea salt, pine nuts

Preheat oven to 400F

Start by heating olive oil in a pan, hot enough to sear your eggplant. After your eggplant is sliced and peeled lightly fry it on each side for about 2-3 mins. Sprinkle with extra sea salt on the side facing upwards while the other side is frying.
In a 9×9 square glass baking dish mix up the rice, sauce, and broth until well combined. Take your fried eggplant slices and nestle them onto the top on your rice mixture, and cover the top with as many as you can. Try and keep them as a single layer. Cover the baking dish with foil and place into the middle of the baking rack. Cook for 30-35 mins.

If you’re feeling fancy you can always toast up some pine nuts to sprinkle on top or even soy mozzarella shreds after it comes out of the oven. Let it cool for a few minutes, and then EAT IT UP. That’s how simple it is!

I hope you enjoy this as much as I did! Leave comments on how yours ends up!

xoxo thissimplevegan

Avocado Cilantro Lime Dressing

Avocado Cilantro Lime Dressing

About a week ago I was having a not-so-great day, and I thought to myself “What could help me change my mood? Exercise maybe?”…but what did I REALLY want?

Of course, it had to do with food…I mean common. The solution was a HUGE salad containing beans, lentils, peppers, onions and topped with an avocado dressing. Don’t worry, it did the job. But while I was assembling this dream team of a leaf meal I knew the dressing was going to have to come from within. This dressing was going to have to be a lightning bolt of yummitude. (Ya, not only do I cook but I also make up words.) SO, I threw a few random ingredients I had on hand into a blender and KABOOM! This creamy, tangy, tastebud-rocking dressing came about. The part that I loved the most? It’s not even bad for you! You get the feeling of a cream dressing, without using any heavy cream in it. This dressing is also awesome because you can use this as a base recipe and turn it into really whatever you want with how much you do or don’t add.

BTW you can totally forgo the salad all together and just sit with a spoon and eat it that way because WHYNOT.

Avocado Lime Dressing
1 ripe avocado
1/4c chopped cilantro
1 TBSP lime juice
1/4 tsp garlic powder
1/2 heaping tsp nutritional yeast
1/8-1/4c olive oil (you can add as much or as little as you want, I used a little less than 1/4c)
salt and pepper to taste

Add the first 5 ingredients into a blender and pulse them together a few times. Then slowly add in your olive oil a little bit at a time until you reach your desired texture. You may have to take the top off your blender and scrape the sides down a few times with a spatula to make sure everything gets mixed.

Once it is to your liking, pour into a separate container and use your spatula to mix in the salt and pepper. Waiting until the end to add your salt and pepper is always safer because you are less likely to over salt which is always a hard fault to reverse.

This can be a great spread, or even a dip(I would suggest swapping in some vegenaise for the oil if you’re going for more of a dip!)

Enjoy! Leave me comments!

xoxo thissimplevegan

PB&J Pancakes, 2 for 1!

PB&J Pancakes, 2 for 1!

Hello my lovely readers! I want to take a quick moment and say thank you for your support during my start up posts.

Up to this post, I have not mentioned breakfast as part of my repertoire….and this is wrong. VERY WRONG. I am a lean, mean, breakfast/brunch making machine. Give me a few hours on a sunday morning and I will kick your standard american brunch’s ass. Something about having those eight uninterrupted hours of brain wave movement help me wake up to a cornucopia of ideas.

I KNOW pb&j isn’t that creative, but I promise this recipe is worth reading and making. Another great reason to keep reading is because not only are these five ingredient pancakes, but I made the strawberry jam for you to try as well! I find the store bought stuff to be way too sugary for my liking and not enough of the fruit’s natural flavor.

strawberry jam

Strawberry Jam
2c strawberries tops cut off and halved (or quartered if bigger)
1/4c COLD water to mix with 1 tsp cornstarch
1/4c water
1 packet of Stevia
1 1/2 tsp chia seeds

In a small bowl mix the cold water and cornstarch until no lumps are left. Once mixed, pour your strawberries, cornstarch mixture, water, stevia, and finally the chia seeds into a small saucepan. Turn the heat to medium-low and let cook (uncovered) until the mixtures starts to bubble, strawberries start to soften and the mixture thickens around it. Remember to stir every few moments because the heating could cause it to stick. Once the mixture has combined into a yummy mush, I took my fork and mashed the strawberries chunks down even more. When choosing strawberries for this jam, I found that the riper, redder ones created the color and taste I was looking for in the final product.

After your jam is cooked, pour into a mason jar and store in the fridge for the next few days. You could also serve warm over ice cream…I’m not sure how long it will keep, because mine was gone in 3 days.

Now for some easy pancakes!

Fluffy Vegan Pancakes
1c whole wheat flour
2tsp baking powder
1 mashed ripe banana
1tsp apple cider vinegar
1+c non dairy milk (to make it to the right pancake consistency, it will change based on the thickness of the milk you chose)

These pancakes are NOT on the sweet side. This is my base pancake, and in my opinion the banana is enough of a sweetener. If you want them a little more like the average pancake, I would suggest adding in your preferred sugar source (But if you top with the jam, I promise you won’t need it!)

In a small bowl, mix the milk and vinegar to start the buttermilk process. Turn your medium sized pan on medium to low heat, and spray with (my favorite is coconut) cooking spray.

In your dry ingredients bowl add in your flour and baking powder. I also like to add just a little bit of flax seed or chia seeds for my fiber in the morning. Add the mashed banana into your other wet ingredients and mix those together. After they are thoroughly mixed, pour wet ingredients into your dry bowl. When it comes to mixing, you want to be careful not to over mix. Combine the ingredients just so there are no major lumps, and enough so they are still thoroughly combined.

From this point you can add whatever else you like into them. I’ve made lemon chia seed(zest of one lemon and a tsp of chia seeds), blueberry, apple pie…..the choices are endless!

After you’ve added your mix ins, pour onto your skillet by the pancake and cook until the bubbles have stopped popping and stay open on the side you can see. Flip em and cook the opposite side. Make sure your skillet isn’t too hot or only the outsides will cook while the inside remains wet. (I’ve done this a few times, I get too excited about them and try to make them cook faster….It’s not worth it, slow and steady)

To form my pb&j pancake tower I simply did this layering.
Pancake, spread on peanut butter, add a few fresh cut strawberries, and next pancake. Repeat until the top pancake. This is when you want to drop some of that amazing jam you made on top, and let it run down the sides of your piping hot pancakes.

Enjoy!!! comment if you’ve tried them out, and how they worked for you!!!

xoxo thissimplevegan

Coconut Cupcakes with Chai Tea Frosting…for a nut-free birthday!

Coconut Cupcakes with Chai Tea Frosting for a nut-free birthday!!!!

It is so. cold. Yesterday on my walk home I knew I needed something warm to keep my fingers from freezing off, so I stopped into a coffee shop and grabbed a chai tea latte with soy milk. When I got home, my roommate and I began to talk about plans for our third roommates birthday. Unfortunately I wasn’t going to be there for the actual day, so I figured I could make her birthday treats a little early. She has a nut allergy, so peanut butter was out…She’s also been eating vegan for awhile (yay!)….and THEN it came to me. CHAI, with…..COCONUT!!!!!!

Furiously my brain started churning with recipe ideas. I’ve been working with baking proportions and making sure they would rise correctly or wouldn’t be too dense, etc. etc.

After compiling all my ingredients I was ready to try it out.

It worked. OH MAN did it work. Chai tea frosting: WHO KNEW?!?! Better than anything, was my roommate coming home to try her birthday treats and loving them!

Here’s the recipe! Enjoy!

Makes 12 cupcakes

Cupcake
1 heaping c flour
1/2 tsp baking soda
1 tsp baking powder
1/2c cane sugar
1/2c coconut shreds
1/8 tsp salt
1c coconut milk
1/4c coconut oil
1 tsp apple cider vinegar
1 tsp vanilla extract

Frosting
1/2c softened Earth Balance butter
3c Vegan powdered sugar
2 chai tea bags
1/4c hemp milk
1/8tsp cinnamon
1/8tsp nutmeg
extra coconut shreds for toasting

Preheat oven to 350* F. Line a muffin pan with liners and spray with cooking spray.

In a small bowl pour in your coconut milk and vinegar to start the curdling process. Let sit for a few minutes.

Grab a larger bowl for your dry ingredients. Sift together all the dry ingredients, and mix.
In your small bowl with your milk and vinegar, pour the rest of you wet ingredients in and mix with a hand mixer. After the wet ingredients are combined, pour into the dry ingredients and mix again with your mixer until there are no lumps.

Fill each cupcake tin about 2/3 of the way. Place into the oven for 20-22 minutes. You should be able to smell the sweet aroma 😉

For the frosting, warm your hemp milk in a mug. Take both of your chai tea bags and steep in the milk for 10 minutes.

While the cupcakes cool, beat your softened butter until fluffy and smooth. Add in your nutmeg, cinnamon, and steeped chai as well as one cup of powdered sugar. Mix this with your hand mixer. After this is mixed, add in another cup of powdered sugar, mix, and then add your last cup of powdered sugar. It should be a light creamy texture with soft peaks.

The last step is to toast up some coconut shreds and sprinkle it on top of your iced cupcakes!

These turned out absolutely DIVINE, and I hope you enjoy them! Please leave comments on your experience!

xoxo thissimplevegan